I've run into a few cases where I want to connect a device (an old computer, a weird IoT gadget) to my home network, it cannot directly connect to my home wifi (because it's too old, doesn't have a wifi adapter, or whatever). In these cases, I've used a Raspberry Pi, which has both a wired Ethernet interface and a wifi interface, to act as a bridge.
There are a bunch of ways to do this, but the general idea is:
- Connect the wired Ethernet device into the Ethernet jack in the Raspberry Pi
- Configure wifi on the Raspberry Pi so it can connect to my home network
- Configure the Raspberry Pi to pass traffic between whatever is connected to its wired Ethernet interface and its wifi connection.
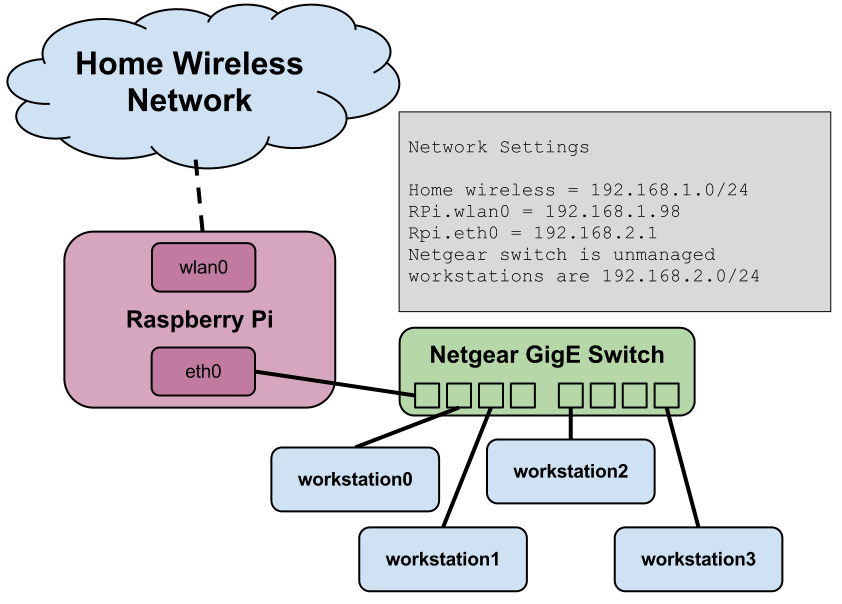
This is a depiction of such a setup:

Here are two ways to accomplish this.
Option 1: ARP proxying
Ben Low pointed out that Proxy ARP is a really neat way to get wired Ethernet devices connected to a wifi network through Raspberry Pi. With this approach, you don't have to set up any separate subnets, run a second DHCP server on your Raspberry Pi, or deal with NAT, port-forwarding, and routing. ARP proxying lets you just plug wired devices into the Raspberry Pi and have them show up on on your wifi network as if the Raspberry Pi wasn't involved.
See the above Proxy ARP guide for a detailed explanation of what is going on here.
Set up ARP proxying
First install the required software:
sudo apt-get install parprouted dhcp-helper
Configure the DHCP relay. This is what lets the DHCP service running on your home
wifi router pass through the Raspberry Pi and reach devices plugged into eth0.
Edit /etc/default/dhcp-helper:
# relay dhcp requests as broadcast to wlan0
DHCPHELPER_OPTS="-b wlan0"
Then enable this helper:
sudo systemctl enable dhcp-helper
Configure network interfaces
Then edit /etc/network/interfaces:
auto lo
iface lo inet loopback

# The internal (wired) interface
allow-hotplug eth0
iface eth0 inet manual

# The external (wifi) interface. change this to match whatever you normally
# need to connect to your home wifi. We also assume your wpa_supplicant.conf
# is already correctly set up.
allow-hotplug wlan0
iface wlan0 inet dhcp
    wpa-conf /etc/wpa_supplicant/wpa_supplicant.conf
    post-up /usr/sbin/parprouted eth0 wlan0
    post-down /usr/bin/killall /usr/sbin/parprouted
    # clone the dhcp-allocated IP to eth0 so dhcp-helper will relay for the correct subnet
    post-up /sbin/ip addr add $(/sbin/ip addr show wlan0 | perl -wne 'm|^\s+inet (.*)/| && print $1')/32 dev eth0
    post-down /sbin/ifdown eth0
Now enable IP forwarding:
sudo sysctl -w net.ipv4.ip_forward=1
And make it persist across reboots by editing /etc/sysctl.conf and making sure
it contains the following:
# Uncomment the next line to enable packet forwarding for IPv4
net.ipv4.ip_forward=1
Restart
You're supposed to be able to restart networking without rebooting to make this all turn on:
sudo systemctl restart networking
sudo systemctl start dhcp-helper
But I recommend rebooting just to make sure everything comes up correctly after a reboot.
Option 2: IP routing
This method creates a separate subnet for everything connected to the Raspberry Pi's wired Ethernet port and uses Linux's IP routing to move traffic between devices connected to that wired Ethernet island and your home wifi. Dealing with routing, NAT, DHCP, and forwarding traffic between two subnets is complicated, so certain use cases may not work here. For example, this setup (as written) would not allow your phone (connected to your wifi) to talk to a device connected to the wired Ethernet, though the wired Ethernet device could talk to the phone.
Configure a DHCP server
First, install a DHCP server on your Raspberry Pi so that devices plugging into its Ethernet jack will get an IP address:
sudo apt-get install isc-dhcp-server
Then configure the DHCP server configuration to hand out IP addresses on the wired
Ethernet interface, eth0. Your /etc/dhcp/dhcpd.conf should contain the following:
# option definitions common to all supported networks...
option domain-name "local";
option domain-name-servers 8.8.8.8, 8.8.4.4;

default-lease-time 600;
max-lease-time 86400;

# subnet declaration for eth0
subnet 192.168.2.0 netmask 255.255.255.0 {
  range 192.168.2.10 192.168.2.100;
  option routers 192.168.2.1;
  option broadcast-address 192.168.2.255;
  option domain-name-servers 192.168.2.1;
}
With this, anything that connects to your Raspberry Pi's eth0 interface will be given an IP address between 192.168.2.10 and 192.168.2.100.
Then edit /etc/default/isc-dhcp-server so it runs on only the eth0 interface:
INTERFACESv4="eth0"
INTERFACESv6=""
Configure network interfaces
Now edit /etc/network/interfaces to
- Statically assign the IP address for eth0 to be the router of our new subnet
- Ensure the wlan0 interface can connect to your home wifi
- The correct IP forwarding rules are applied when networking comes up
First, edit /etc/network/interfaces:
# The loopback network interface
auto lo
iface lo inet loopback

# The internal (wired) network interface
allow-hotplug eth0
iface eth0 inet static
  address 192.168.2.1
  netmask 255.255.255.0

# the external (wifi) interface. change this to match whatever you normally
# need to connect to your home wifi. We also assume your wpa_supplicant.conf
# is already correctly set up.
allow-hotplug wlan0
iface wlan0 inet dhcp
  wpa-conf /etc/wpa_supplicant/wpa_supplicant.conf

pre-up iptables-restore < /etc/network/iptables
The contents of /etc/network/iptables are:
*filter
:INPUT ACCEPT [73:5085]
:FORWARD ACCEPT [0:0]
:OUTPUT ACCEPT [72:6792]
-A FORWARD -i eth0 -o wlan0 -j ACCEPT
-A FORWARD -i wlan0 -o eth0 -m state --state RELATED,ESTABLISHED -j ACCEPT
COMMIT
*nat
:PREROUTING ACCEPT [43:2584]
:INPUT ACCEPT [2:278]
:OUTPUT ACCEPT [0:0]
:POSTROUTING ACCEPT [0:0]
-A POSTROUTING -o wlan0 -j MASQUERADE
COMMIT
Now enable IP forwarding:
sudo sysctl -w net.ipv4.ip_forward=1
And make it persist across reboots by editing /etc/sysctl.conf and making sure
it contains the following:
# Uncomment the next line to enable packet forwarding for IPv4
net.ipv4.ip_forward=1
Restart
You're supposed to be able to restart networking without rebooting to make this all turn on:
sudo systemctl restart networking
sudo systemctl restart isc-dhcp-server
But I recommend rebooting just to make sure everything comes up correctly after a reboot.