General Approach
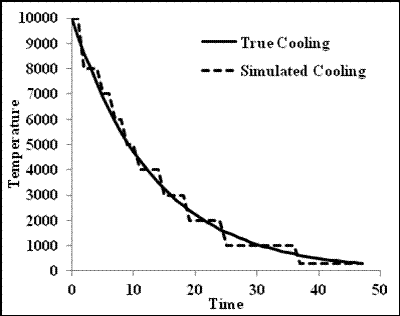
Creating Temperature profile during quencha glass using molecular dynamics is analogous to creating a glass in real life; you melt a crystalline precursor at high temperature, then rapidly quench it to room temperature. While the quenching process in real life involves a continuous removal of thermal energy (and a continuous decrease in temperature), our simulation code is typically limited to simulating a system at only one temperature.

Temperature versus time for a simulated melt-quench and a real one.
As a result, the process of quenching a molten glass in MD is actually comprised of a series of simulations conducted at increasingly lower temperatures.
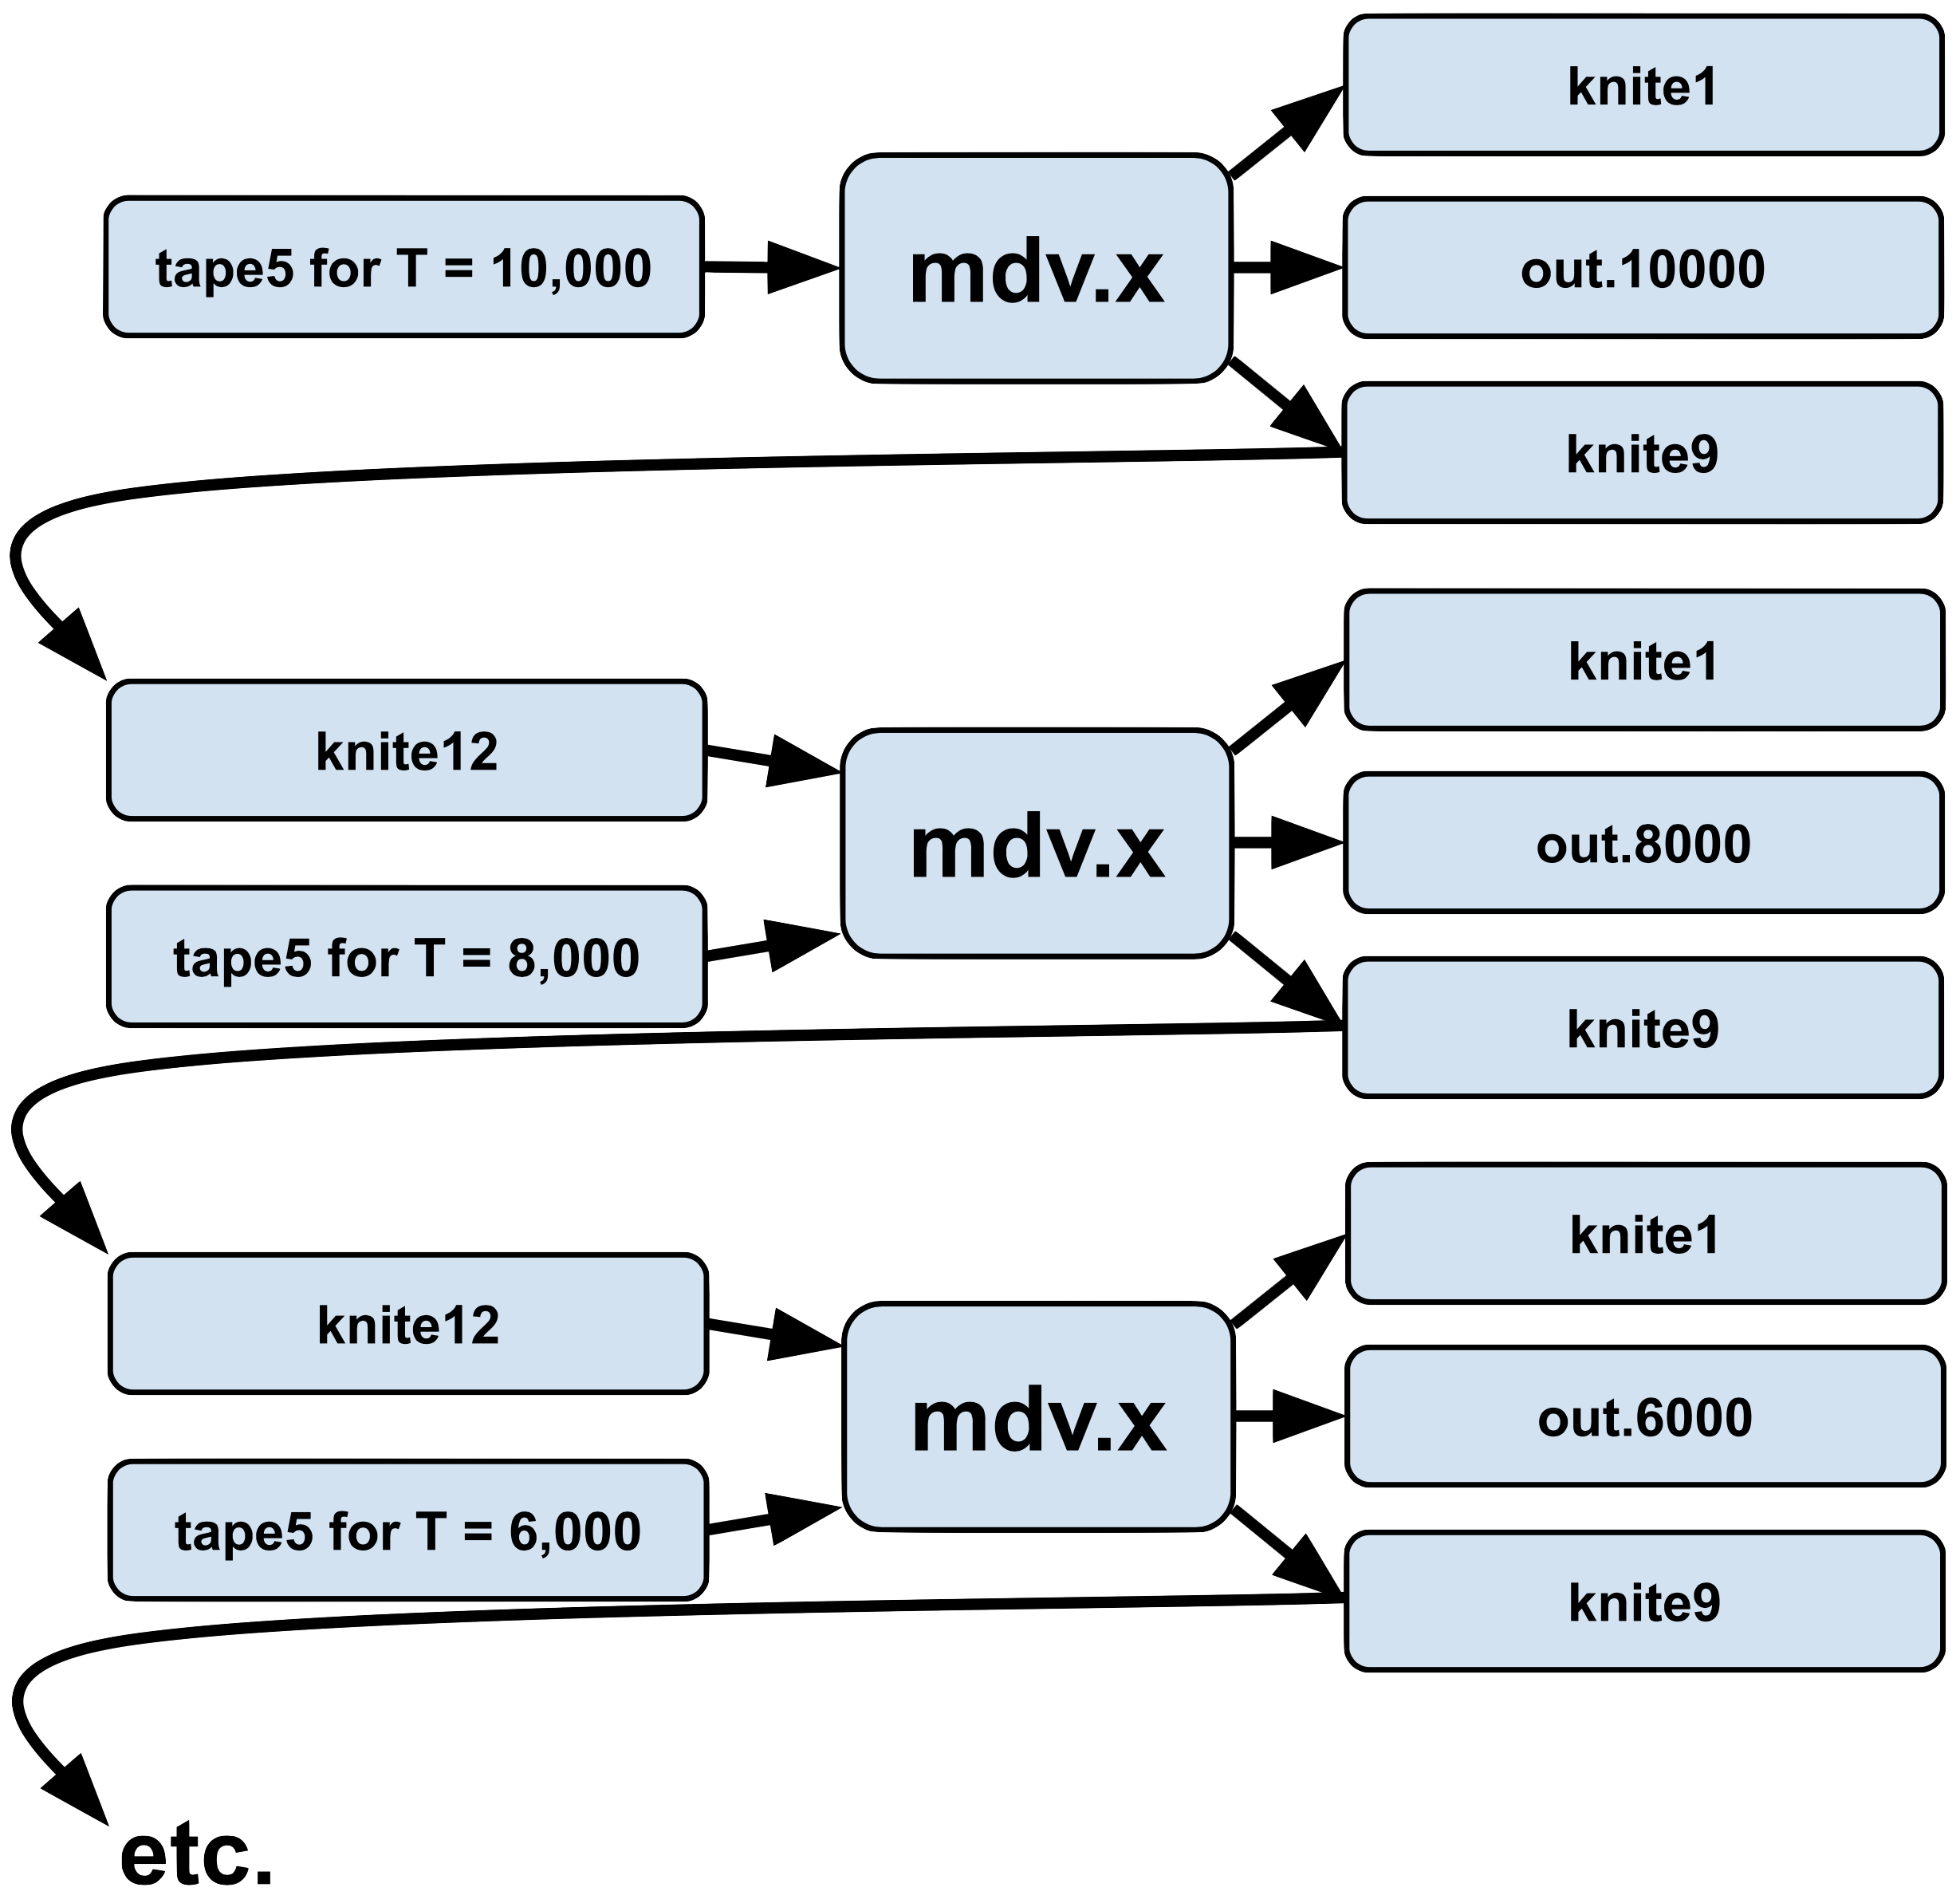
One tape5 for each intermediate temperature in the quench is created, and the melt-quench process is carried about by simulating a temperature and feeding its knite9 into the next lower temperature's simulation:

Schematic of the melt-quench procedure
Setting up the Melt-Quench
Step 1. Create a new directory in which your melt-quench simulation will be run, then go into that directory.
$ mkdir dir.glass
$ cd dir.glass
Step 2. Copy the template tape5 and pressure.list from your home
directory (~) into this new directory (.)
$ cp ~/tape5 ~/pressure.list .
Step 3. Make one copy of this tape5 for every temperature step to be included in your melt-quench.
$ cp tape5 tape5.10000
$ cp tape5 tape5.8000
$ cp tape5 tape5.7000
...
Step 4. Edit each tape5 and change the temp, istop, iequil,
iprint, isave, and istore parameters to the appropriate values described
by the melt-quench recipe below.
$ vi tape5.10000
...
$ vi tape5.8000
...
Step 5. In the tape5 for the first step (T=10,000), set ntype=1,
icry=5, ilx=4, ily=4, and ilz=4. Leave the other tape5s with ntype=3.
$ vi tape5.10000
...
Step 6. Ensure that the pressure.list is appropriately configured for constant volume.
$ vi pressure.list
...
Step 7. Copy the melt-quench queue script into your melt-quench directory, then submit it to the cluster and ensure it doesn't immediately crash out.
$ cp ~/qscript.mq.sh .
$ qsub -q all.q@node2 qscript.mq.sh
$ qstat
This is a typical "recipe" for a melt-quench using the Born-Mayer-Huggins potential:
| Temperature (K) | istop | iequil | iprint | isave | istore |
|---|---|---|---|---|---|
| 10,000 | 20,000 | 10,000 | 2,000 | 2,000 | 2,000 |
| 8,000 | 40,000 | 20,000 | 4,000 | 4,000 | 4,000 |
| 6,000 | 50,000 | 20,000 | 5,000 | 5,000 | 5,000 |
| 5,000 | 50,000 | 20,000 | 5,000 | 5,000 | 5,000 |
| 4,000 | 50,000 | 15,000 | 2,000 | 2,000 | 2,000 |
| 3,000 | 40,000 | 15,000 | 2,000 | 2,000 | 2,000 |
| 2,000 | 20,000 | 10,000 | 1,000 | 1,000 | 1,000 |
| 300 | 40,000 | 20,000 | 1,000 | 1,000 | 1,000 |
Setup Details
Step 1: It is always a good idea to run melt-quench jobs in their own directories. This minimizes the chances of your job accidentally overwriting existing data.
Step 2: It is often a good idea to keep a "pristine" set of input files
(tape5 and pressure.list) in your home directory in case you accidentally
mess up the tape5 you are editing in a subdirectory. The example commands
shown assume you have followed this convention.
Step 3: Make sure that the tape5 from which you are making these copies
has parameters such as redens and cte set properly. Since these parameters
don't change between temperature steps in the melt-quench, copying a tape5 with
the correct values is a lot easier than editing every single tape5 after the
fact.
Step 4: Remember that spaces matter in tape5. Be sure to not disrupt the
alignment of the various input fields. Also remember to enter floating-point
values (such as temp) as floating points (e.g., 300.0 or 300.0D0) and
integers (such as istop) as integers (50000).
Step 5: ntype=1 indicates that the simulation code should not look for a
knite12; rather, it generates a crystal on its own based on icry, ilx,
ily, and ilz. icry=5 corresponds to β-cristobalite, and
ilx=ily=ilz=4 means generate a system that is 4x4x4 unit cells large.
Be sure that all but the first tape5 have ntype=3 though; otherwise, each
tape5 will simply re-generate a new crystal rather than continue where the
previous simulation left off.
Step 6: Constant volume simulations have all three values on the first line
of pressure.list zeroed out. Be sure that these are double-precision zeroes
(0.0d0), not integer zeroes (0).
Step 7: qscript.mq.sh serves two functions. First, it contains all the
parameters needed by the cluster to queue up the simulation. Second, it
handles the process of "connecting" each step of the melt-quench process. In
essence, it just does
$ cp tape5.10000 tape5    # ensure that the correct tape5 is in place
$ mdv.x > out.10000       # run the simulation code, redirecting output to "out.10000"

$ mv knite1 knite1.10000  # rename knite1 so the next step doesn't overwrite it

$ mv knite9 knite9.10000  # rename knite9 so the next step doesn't overwrite it
$ cp knite9.10000 knite12 # use this step's output (knite9) as the next step's input (knite12)

$ cp tape5.8000 tape5     # ensure that the correct tape5 is in place
$ mdv.x > out.8000        # run the simulation code, redirecting output to "out.8000"
...
This script is a text file that you can edit with vi. Take a look at it to
see if you can figure out what it does. You may want to change the job name
(the line at the top beginning with #$ -n ... or specify a new simulation
code (BINARY=...)
The qstat command shows what jobs you have running on the cluster. Adding the
-f option (qstat -f) shows all available nodes and how many CPU slots are
in use on each one:
queuename                      qtype used/tot. load_avg arch          states
----------------------------------------------------------------------------
all.q@node10.cluster           BIP   0/4       0.00     lx24-amd64
----------------------------------------------------------------------------
all.q@node11.cluster           BIP   0/4       0.00     lx24-amd64
----------------------------------------------------------------------------
all.q@node2.cluster            BIP   0/4       0.00     lx24-amd64
...
At the IMSL, some nodes are unofficially reserved for certain researchers, so
it is a good idea to submit your jobs to particular nodes that are (1) not
reserved for someone else, and (2) have open slots. The 0/4 under used/tot
indicates that 0 out of 4 CPU slots are in use. To submit your queue script
to a specific node (e.g., node 11), use the -q option followed by the node's
"queuename" from qstat -f. For example,
qsub -q all.q@node2.cluster qscript.mq.sh
The trailing .cluster can be safely omitted for convenience (e.g., qsub -q all.q@node2 qscript.mq.sh).
Immediately after being submitted, qstat (no -f) will show jobs you have
running and return something like this:
job-ID  prior   name       user         state submit/start at     queue       slots
-----------------------------------------------------------------------------------
6863    0.00000 ggMQ       glock        qw    02/09/2012 01:10:18
Note the state field being qw. This indicates that the job is in the
process of being launched on the cluster. If you issue qstat again after a
minute, you should see that the state has changed:
job-ID  prior   name       user         state submit/start at     queue       slots
-----------------------------------------------------------------------------------
6863    0.55500 ggMQ       glock        r     02/09/2012 01:10:29 all.q@node11.cluster
The state should have updated to r (running) and the node on which the job
is running should now be visible. If your job disappears after the qw state,
it is likely that your job failed for some reason.
Pitfalls and Problems
The cluster will print all job-related errors to a file often called something
like stderr or stderr.out. When a job fails to launch, this file will
likely indicate what the failure was; perhaps tape5 was missing or got
corrupted, or perhaps knite12 doesn't exist when ntype=3. Unlike most other
files though, this error log is appended rather than overwritten, so it may
contain the errors caused by previous failures to launch the job. In the
case of melt-quench procedures, an early error will usually cause a cascade of
errors (one set for each temperature) which can also obfuscate debugging. Check
to see what the first error was.
Designing Melt-Quench Procedures
The exact choice of istop, iequil, etc. for each step is somewhat arbitrary,
but here are some general guidelines:
istopfor the highest temperature (T=10000) need not be long; this step just ensures amorphization of the initial crystal.iprint/isave/istorecan be relatively large because the results of this step are rarely examined post-simulation.iequilis typicallyicalc/3 toicalc/2. If there is a big jump in temperature between two consecutive steps (e.g., from 2000 K to 300 K),iequilshould be larger to ensure enough time for the system to adjust.- Lower temperatures generally benefit from more saves (lower
isave) since these temperatures are more physically meaningful and might contain more meaningful data. - Setting
istore=isaveis a reasonable convention; it ensures thatknite1andknite9get updated at the same time.
As you run more simulations, you will get a better feel for the appropriate values here.
Next page: Basic Analysis